| |

|
|
Overview |
BirdSlide® has been proven to be the most efficient and effective product application for the complete exclusion of nesting or roosting birds. BirdSlide® is a one time fix that is lightweight, easy to cut, effortless to handle, and totally harmless to the birds. It is important to understand that BirdSlide® will evict all birds from their roosting and nesting areas when properly installed. Download PDF Instructions here. |
Step 1: Clean
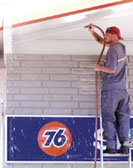 |
Cleaning the affected nesting or roosting areas is an important and necessary step for the proper installation of BirdSlide®. Because BirdSlide® is bonded to the affected surface, proper cleaning is necessary for maximum adhesion. Over time, the buildup of bird droppings on a ledge, beam or eave can become quite a mess. All of the bird waste and debris must be thoroughly and carefully removed. It is recommended that the bird feces and debris be first wetted and neutralized with a disinfectant. This will reduce the potential of breathing in hazardous aerosolized spores and will make your cleaning job easier. Use a disposable cloth to wipe area clean. Sometimes a hard nylon bristle brush will be necessary to remove droppings that are oxidized and have become hardened and encrusted into the surface. If there is a large build-up of bird feces, pressure washing may be necessary.
Note: It is important to always follow standard pest control safety procedures when cleaning and removing bird waste. It is recommended that proper attire be worn which includes: a hazardous material suit (complete with hood, goggles), boots, gloves and a respirator.
Some areas with a high content of bird feces will leave behind a stain even after you have manually cleaned or pressure washed the surface. This staining will not affect the adhesion process as long as the surface is clean and dry. Only those areas that will receive the BirdSlide® product will require manual cleaning or pressure washing (unless of course, you want to impress your customer). It is strongly recommended that you “clean up your mess” and properly dispose of all bird feces. You will have time to perform this task because the pressure washed area will need time to dry before you adhere the BirdSlide® to your structure. Again, it is important to have a dry surface before attempting to install BirdSlide®. While you are waiting for the structure to dry, you can begin preparing the necessary tools and material that you will need for the installation stage.
Tools for Installation
BirdSlide® does not require a lot of tools for installation. Simple cutting tools and adhesive silicone #2 (by G.E.) is all you will need to begin installing. We recommend you have a hacksaw, tin snips, razor knife, tape measure, silicone adhesive tubes and “gun”, and a marking pencil. An option to consider would be to have a support technician cutting the BirdSlide® beams to size with a portable table saw. This would enable the installation process to proceed more rapidly |
|
| |
Step 2: Measure
|
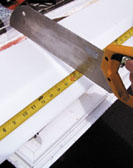
Before you begin installation you will need to measure out the area that will need BirdSlide®. BirdSlide® is manufactured in 4 foot length beams that can be custom cut to fit the affected area. Measure out the surface area to be covered. Measure both width and the depth of the surface area to be treated. Measure and mark the BirdSlide® beam and cut the size needed. Simple cutting tools like tin-snips, hand saws or a razor knife can be used to trim away excess area. A good job of measuring and trimming BirdSlide® will insure a clean finished fit. And after color matching BirdSlide™ with a primer and exterior coat paint it will be virtually undetectable.
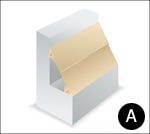
BirdSlide® can be custom cut to fit most areas. The depth of the affected surface will determine how much of the “slide trim area” will need to be trimmed away. If the depth is greater than 5-7/8", BirdSlide® can be stacked and bonded together to create a longer slide that will cover the larger area (see diagram A). Also, BirdSlide® Extensions will provide coverage for depths larger than 6 inches. Call Bird Barrier® the official distributor of BirdSlide® at 1-800-NO-BIRDS for more information. Now that you have custom cut the BirdSlide® beams for the measured area it is time to prepare the beam for installation. |
| |
Step 3: Install

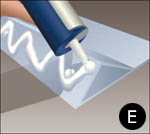 |
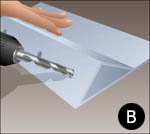
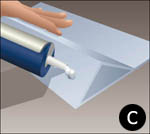
In the center of the bottom of the BirdSlide® drill a 1/2” hole every 12 inches in a straight line lengthwise down the center. (See Diagram B). After you have drilled the holes wipe away the plastic shavings and any electrostatic dust that might be clinging to the plastic beam. Using your caulking gun with silicone adhesive #2 apply a generous amount of the adhesive over the hole (See Diagram C) so that it creates a mushroom head on the inside triangle of BirdSlide® (See Diagram D). When these areas dry it will create a “bolt” effect that will enhance the adhesion process In addition to the holes, lay down a generous amount of silicone on the bottom of the BirdSlide® beam with a squiggle motion (back and forth) ie:WWWWWWWWWW (See Diagram E)
Before you begin installing your trimmed BirdSlide® Beams, be sure that the surface area that has been cleaned in Step 1 is completely dry and free of dust. Installing BirdSlide® is very much like installing tiles or grout in your bathtub. You want to make sure that enough silicon adhesive is laid down on the BirdSlide® beam to secure a strong hold. This will insure a clean secure bond. Tap the BirdSlide® into place and wipe away any excess silicon adhesive before it dries. The drying or curing of the silicon adhesive bond will take up to 24 hours. However, within minutes BirdSlide® will be attached strong enough for you to begin the last step: Painting.
Think like a Bird
Remember that in order to eliminate and defeat nuisance birds from a building you must think like a bird. Look for natural flat surfaces that occur on the structure that appear to be potential areas for roosting or nesting. The most desirable areas for a birds to nest are often sheltered flat surfaces or areas that are somewhat protected by a stationary barrier (wall, Ibeam etc) from wind currents and the outside elements. These areas must be eliminated. In consultation with your customer, use your best judgment as to the extent of the coverage area that will be needed. |
| |
Step 4: Painting
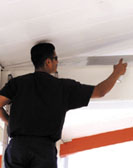 |
BirdSlide® can be custom color matched to blend in with the structure you are working on. To achieve a quality result when painting BirdSlide®, preparation is key. First, the BirdSlide® beams should be wiped clean of any dust particles. Then, it is suggested that you paint the beams with an appropriate primer to prevent premature paint chipping. This will also enhance the color and longevity of the paint. Many home improvement stores, paint stores and hardware stores will offer a wide selection of quality exterior coat paints. Any of these quality exterior paints will work well with BirdSlide®. Remember to thoroughly coat the beam with the exterior paint. This will provide that clean finished look. Drying time will depend on the climate and the paint you are using. Be sure to review the information on the back of your paint can for drying time. Now that you have finished painting you have completed the final step in the installation. You and your customer can review a job well done and a bird control system that will immediately begin working to deter nuisance birds.
BirdSlide® can be custom color matched to blend in with the structure you are working on. To achieve a quality result when painting BirdSlide™, preparation is key.
A. First, the BirdSlide® beams should be wiped clean of any dust particles.
B. Then, it is suggested that you paint the beams with an appropriate primer to prevent premature paint chipping. (A flat white latex paint will also work well as a primer.)
C. Apply one even coat of the primer then let dry. This first coat of primer will enhance the color and longevity of the paint.
D. Then follow through with 2 even coats of your chosen color matched paint. Many home improvement stores, paint stores and hardware stores will offer a wide selection of quality exterior coat paints. Any of these quality exterior paints will work well with BirdSlide®.
E. An option for painting that also works well but has some limitations is aerosol enamel paints (Krylon).
These canned enamel based spray-on paints work well without a primer coat, however there are limitations in the choice of color. If getting an exact color match is not critical to the customer, spray-on enamel paint provides an excellent alternative that is an easy and quick way to complete this final step.
Whether you are using an exterior coat paint or enamel spray-on paint, remember to coat the BirdSlide® beam
with a generous even amount of paint. This will provide that clean finished look. Drying time will depend on the climate and the paint you are using. Be sure to review the information on the back of your paint can for drying time. Now that you have finished painting you have completed the final step in the installation. You and your customer can review a job well done and a bird control system that will immediately begin working to deter nuisance birds.
BirdSlide®...The long lasting, easy-to-install bird control barrier that will provide you with years of “bird-free” protection.
Attention Bird Control Managers: For large commercial jobs, BirdSlide® can be pre-color matched in the manufacturing process. Ask your authorized dealer for details.
WARNING: All surface areas must be thoroughly cleaned and pressure washed if necessary to remove all bird debris and droppings. It is important to exercise safety precautions when removing bird waste. Proper clothing and respirators are recommended. Consult your local licensed pest control company for further information. Do not begin installing BirdSlide® until all surface areas are dry. Areas that are not dry will not create a secure bond. Make sure use what BirdSlide® recommends. |
|
|
|